Astrophotography Calibration Frames: Darks, Flats, and Biases
Capturing stunning images of the night sky often requires more than just pointing your telescope and camera at a celestial target. While the raw data you collect – your “lights” – contain the beauty of nebulae, galaxies, and star clusters, they also contain unwanted noise and imperfections introduced by your equipment and the camera’s sensor. This is where calibration frames come in. These seemingly obscure images are essential for significantly improving the final quality of your astrophotography.
Why Use Calibration Frames?
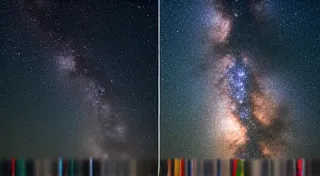
Calibration frames are taken under specific conditions and subtracted from your "light" frames during image processing. They remove systematic errors, reducing noise and revealing more detail in your final image. Think of it like dust and dirt on your lens—calibration frames help clean up the image. Understanding how these frames work and why they’re necessary is a key element in achieving clear and detailed results. Ultimately, the more you learn about the nuances of your equipment, the better your images will be, and this sometimes means getting comfortable with the more technical aspects like focal length – a critical factor in how much of the sky you can capture in a single frame. You can learn more about understanding focal length in astrophotography to further improve your results.
The Three Main Types of Calibration Frames
1. Dark Frames
Dark frames capture the thermal noise generated by your camera’s sensor. This noise appears as a grainy pattern, especially during long exposures. It's caused by the sensor's electronics heating up and producing a signal even when no light is hitting it. The longer your exposures, the more pronounced this thermal noise becomes, and the more crucial dark frames become to correct for it. Accurate dark frame acquisition is a core principle in the astrophotography workflow, requiring care and attention to detail.
How to Take Them: Set your camera to the same ISO, exposure time, and temperature (if applicable) as your light frames. Cover the camera lens completely (a lens cap or something opaque works well). Take 20-30 dark frames. The more, the better, but a good average is often enough.
2. Flat Frames
Flat frames correct for dust motes on your camera sensor and variations in the illumination across the sensor. Dust motes appear as dark spots in your images, and uneven illumination can lead to brightness variations across the sensor. These imperfections can drastically impact image quality and detail. Proper flat-fielding is essential for revealing the faintest structures in your deep-sky targets.
How to Take Them: You need a uniformly illuminated surface. Many astrophotographers use a white t-shirt stretched over a light source. Take 20-30 flat frames at the same focal length and exposure as your light frames. Slightly underexposing the flats is generally recommended to avoid blowing out highlights.
3. Bias Frames (also known as Offset Frames)
Bias frames capture the read noise introduced by the camera's electronics during the readout process. This noise is a subtle but consistent pattern that can be reduced by subtracting bias frames. Bias frames are often confused with dark frames, but they address a different type of noise originating from the camera's internal circuitry. They are taken with the shortest possible exposure time and lowest ISO setting.
How to Take Them: Set your camera to the lowest possible ISO, the shortest possible exposure time (typically 1 second or less), and the same temperature as your light frames. Cover the camera lens completely. Take 20-30 bias frames.

Processing Calibration Frames
Most astrophotography processing software (e.g., PixInsight, DeepSkyStacker, Astro Pixel Processor) has dedicated tools for managing and applying calibration frames. The general process involves:
- Master Darks: Combine your individual dark frames into a "master dark" by averaging them.
- Master Flats: Combine your individual flat frames into a "master flat."
- Master Bias: Combine your individual bias frames into a "master bias."
- Calibration: During stacking, instruct the software to subtract the master dark and master bias, and to divide by the master flat.
The process can seem complex initially, but the results are well worth the effort. Achieving clean images often requires careful attention to detail and a methodical approach. For some, particularly beginners, the challenges of achieving pinpoint accuracy in guiding can be daunting. However, consistent and reliable guiding is essential for capturing sharp, detailed images, especially when dealing with long exposures and tracking faint objects. If you’re new to astrophotography and struggling with guiding, you might find our beginner’s guide to guiding in astrophotography helpful. It covers the fundamentals and offers practical tips for improving your tracking accuracy.
Advanced Calibration Techniques and Considerations
Beyond the basic darks, flats, and biases, advanced astrophotographers often employ more sophisticated calibration techniques. These can include Drizzle processing for improving resolution and specialized flat-fielding methods to correct for more complex sensor variations.
Furthermore, the environment in which you're imaging can significantly impact the effectiveness of your calibration frames. Humidity, temperature fluctuations, and even vibrations can introduce new sources of noise and imperfections. Maintaining a stable and controlled environment is crucial for maximizing image quality.
Choosing the Right Equipment for Calibration
While a simple lens cap can suffice for taking dark frames, specialized equipment can streamline the calibration process. Flat-fielding panels provide a consistent and even light source for taking flat frames, while automated temperature control systems can help maintain a stable camera temperature for consistent dark frame acquisition. The equipment you choose will depend on your budget and the level of precision you aim to achieve.
The Impact of Lunar Imaging on Calibration
When imaging the Moon, the extremely bright surface reflections necessitate a different approach to calibration. While dark frames are still beneficial for reducing thermal noise, flat frames are less critical due to the abundance of light. However, careful attention to detail is still required to avoid overexposing the sensor and introducing artifacts into the final image.
Conclusion
While taking and processing calibration frames can seem like an added step, the improvement they bring to your astrophotography images is well worth the effort. By carefully capturing and applying darks, flats, and biases, you can significantly reduce noise, reveal faint details, and produce truly stunning images of the night sky. The journey into astrophotography is a continuous process of learning and refinement, and mastering calibration techniques is a cornerstone of achieving exceptional results. And when you’re ready to focus on capturing the Moon's intricate details, you might find our guide to lunar astrophotography a valuable resource. Ultimately, the right gear, combined with a solid understanding of calibration principles, can unlock the full potential of your astrophotography setup. Before you invest in new equipment, consider carefully your goals and budget to ensure you make informed decisions. And if you’re feeling overwhelmed by the number of options available, remember that even a basic setup can produce incredible results with careful planning and attention to detail.